'Sigmas Mirror' because the pattern on the outside reminds me of the greek letter sigma, just mirrored.
Its kind of a combination between several Snake Knots and the Endless Falls from J.D. Lenzen.
I've tried different pattern in the middle but like this one most.
Used (boiled) paracord for:
~22cm (~8.7 in.) bracelet
~160cm (~5.3 ft.) electric blue
~160cm (~5.3 ft.) white
~135cm (~4.5 ft.) neon turquoise
To prevent the bracelet from shrinking, I recommend to put it in boiling hot water for a few minutes.
Step 01:
As shown in Knotorial 01, start with a buckle connected to three colors.
Put the shortest cord in the middle.
Step 02:
Turn the bracelet to the backside, then use the outer cords to form a cross laying over the other cords.
Always remember which cord you use first, i'll start with the right cord then laying the left cord over it.
Step 03:
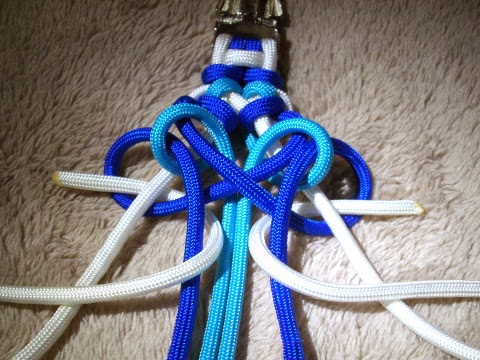
Use the cords from the cross to form a loop, first behind, then over the other cords on the left and right side, as shown in the picture.
Step 04:
Pull the ends from the shortest cord through the upper cross.
Pull the ends from the shortest cord all the way through the the upper cross, it keeps the cross and the loops together.
Step 05:
Pull the remaining unused ends through the loops from the cross.
Pull the remaining unused ends all the way through the loops from the cross, forming a Snake Knot.
Make sure you don't involve the short strands in that knot, it would change the pattern.
It should look as shown in the picture.
Step 06:
Tighten the loops and knots firmly.
Pull on the strands that form the cross instead of just pulling on the ends.
Good job !The technique to tie Sigmas Mirror is already completed.
Take a look at your frontside, the result should look as shown in the picture.
To continue the pattern, repeat
Step 02 - Step 06, just using the opposite colors.
For the overview I'll add some pictures of these steps with opposite colors.
Use the outer cords to form a cross and the loops.
Pull the ends from the shortest strands through the upper cross.
Pull the ends from the shortest strands all the way through the upper cross.
It keeps the cross and the loops together.
Pull the unused outer ends through the lower loops from the cross.
Pull the outer ends all the way through the lower loops from the cross, forming a Snake Knot.
Make sure you don't involve the shortest strands that lay in the middle, it would change the pattern.
Tighten the loops and knots firmly.
Take a look at your frontside, the result should look as shown in the picture.
Repeat Step 02 - Step 06 to continue the pattern until you reached the desired bracelet length.Don't forget to calculate the buckle and the finish for the length.
Step 07:
To finish the piece and attach the other part of the buckle, turn the bracelet to the backside and loosen the loops from the short strand a little.
Step 08:
Use the short strands from the middle and pull them through its own loops, as shown in the picture.
Step 09:
Turn the bracelet to the frontside and use the outer cords to form simple loops around the remaining middle strands, one with the right side...
Step 10:
...and one with the left side...
...to get a result as shown in the picture.Do not firm these loops, because you need it for the finish.
Step 11:
Pull the remaining lower cords through the frontside of the buckle.
Step 12:
Turn the bracelet to the backside again and pull the middle cords through both loops that were created in Step 08 and Step 09.
Step 13:
Pull the remaining ends each through one loop, as shown in the picture.
Step 14: Tighten the loops and knots firmly.
Hold the buckle and pull on the ends.
The frontside should look as shown in the picture.
Step 15:
Cut and singe the ends on the backside to finish the bracelet.
Sometimes it looks good to paint the singed ends, I use a common cd-marker for that.
The finished bracelet.I hope you enjoyed tieing
Sigmas Mirror !
Feel free to post pictures of your results and of course feedback is always welcome so I can be sure there are no steps missing.
Thank you !


