Wednesday, June 18, 2014

Knotorial 12 - The Bullfrog (Bracelet)

This pattern reminds me of a frog, particularly frog's legs.

It's somewhat challenging to tie and firm this one, but it's a nice design and doesn't need much cord.

The weave is not very thick, but you'll need more length than your wrist measures.

Used (boiled) paracord for:
~21cm (~8.2 in.) bracelet

~170cm (~5.6 ft.) neon green
~170cm (~5.6 ft.) charcoal grey

This sample is 21cm long and is a slightly loose fit to my 17,5cm wrist.

To prevent the bracelet from shrinking, I recommend to put the cords in boiling hot water for a few minutes.
Step 01:

Start with a buckle connected with two colors.

Knotorial 01 shows, how to attach the cords.

 Step 02:

This design is tied by the backside.

Use the inner cords to form loops around the outer cords, first behind, then over them.
 Step 03:

Use the outer cords to form a cross over the inner cords.
 Step 04:

Use the inner cords to form loops around the outer cords again, this time over, then behind them.
 Step 05:

Pull the ends from the outer cords through both loops
on each side.
 Pull the ends all the way through the loops.
 Step 06:

That's all ! Tighten the loops and knots firmly, pull on every loop to get a good result.

It's somewhat difficult a couple of times, but I got used to it fairly quick.
Your frontside should look as shown in the picture.

The inner and outer colors should be inverted now.
 To continue the pattern, repeat
Step 02 - Step 06 until you reached the desired bracelet length.

Don't forget to calculate the buckle and the finish for the length.


Step 07:

To finish the bracelet, turn it to the frontside and use the outer cords to form loops around inner cords, going over, then under them.

Form another loop on the other side.
Step 08:

Pull the cords through the frontside of the other piece of the buckle.

Step 09:

Turn it to the backside and pull the inner cords through both loops that were created in Step 07.

Step 10:

Pull the remaining outer cords through the loops, one on each side.

Step 11:

Tighten the loops and knots firmly to get a result as shown in the picture.

Step 12:

Cut and singe the ends.

The finished bracelet.
I hope that you had no difficulties tying The Bullfrog.

Feel free to post pictures of your results or leave some feedback.

Thank you and happy knotting !

Friday, May 30, 2014

Knotorial 11 - The Bermuda Trail (Bracelet)

This weave is called
'The Bermuda Trail'.

It was created last night when I couldn't sleep.


Used (boiled) paracord for:
~20,5cm (~8 in.) bracelet

~140cm (~4.6 ft.) black
~140cm (~4.6 ft.) red
~170cm (~5.6 ft.) goldenrod

It's a thick weave and this 20,5cm bracelet fits my 17,5cm wrist very well.

To prevent the bracelet from shrinking, I recommend to put the cords in boiling hot water for a few minutes.
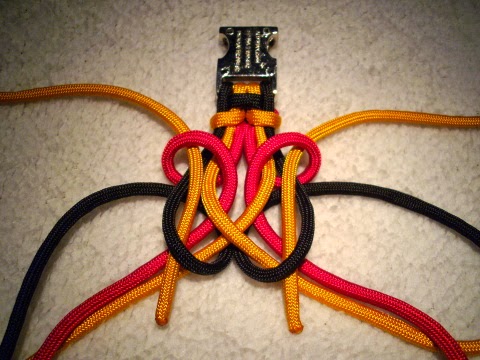
Step 01:

As shown in Knotorial 01, start with a buckle connected to three colors.

Make sure you use the correct cord length and arrange it as shown in the picture.
 Step 02:

This weave is tied on the backside of the bracelet.

Use the middle cords to form loops around the outer cords, first behind then over them.
 Step 03:

Use the longest strands to form a cross over the inner cords.
 Step 04:

Use the outer cords to
form loops around the inner
cords on both sides, as shown
in the picture.
 Step 05:

Pull the ends from the longest cords first behind then through both loops on the left and right side.
 Pull the ends from the longest cords all the way through the loops.
 Step 06:

Tighten the loops and knots firmly to get a result as shown in the picture.
Check your frontside, it should look like this.
 Repeat Step 02 - Step 06 to continue the pattern until you reached the desired bracelet length.

Don't forget to calculate the buckle and the finish for the length.
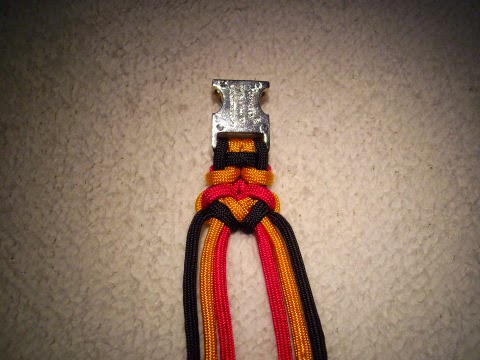
Step 07:

To finish the bracelet, turn it to the frontside and form a cross with the outer cords.

Start with the right side and lay the outer cord over the other strands, then behind the cords on the left side.

Step 08:

Repeat Step 07 on the opposite side.

Step 09:

Pull the outer ends through the upper loops from the cross.

Step 10:

Pull the remaining inner cords through the other part of the buckle.

Step 11:

Turn the bracelet to the backside and pull the inner cords through the loops formed in Step 07 and Step 08.

Step 12:

Tighten the loops and knots firmly.

Hold the buckle and pull on the ends to get a result as shown in the picture.

Step 13:

Cut and singe the ends.

 The finished bracelet.
I hope you had no trouble following this knotorial.

Feel free to post pictures of your results or leave some feedback !

Happy knotting.

Friday, May 23, 2014

Knotorial 10 - Anubis Scepter (Bracelet)

This design was discovered while playing with the 'Bell Curve Knot'.

When I look at it, there come two things to my mind - hieroglyphics or overrun squirrels.

But I like animals so it's just called 'Anubis Scepter'.

Used (boiled) paracord for:
~19cm (~7.5 in.) bracelet

~125cm (~4.1 ft.) black
~155cm (~5.1 ft.) tan 499

It's a thick weave and this 19cm bracelet didn't fit my 17,5cm wrist.

To prevent the bracelet from shrinking, I recommend to put the cords in boiling hot water for a few minutes.

Step 01:

Start with a buckle connected with two colors.

Knotorial 01 shows how you can attach the cords.

The longest cord should stay in the middle.


I used a small buckle since it's a thick but slim weave.
 Step 02:

The weave is tied on the frontside.

Use the right outer cord to form a loop around the right inner cord, first over then behind it.
 Step 03:

Use the inner cord and form a 'Bell Curve' behind the outer cord.
 Step 04:

Pull the 'Bell Curve' through the loop from the outer cord as shown in the picture.
 Step 05:

Pull the end from the left inner cord through the 'Bell Curve'.
 Step 06:

Pull the left inner cord all the way through the 'Bell Curve'
.
Step 07:

Tighten the loops and knots firmly.

 Step 08:

Repeat the steps on the other side by forming a loop with the left outer cord, then form the 'Bell Curve' with the left inner cord behind it.
 Step 09:

Pull the 'Bell Curve' through the loop.
 Step 10:

Pull the end from the right inner cord through the 'Bell Curve'.
 Step 11:

Pull the right inner cord all the way through the 'Bell Curve'.
Step 12:

Tighten the loops and knots firmly to get a result as shown in the picture.

 Well done !

Repeat Step 02 - Step 12 to continue the pattern until you reached the desired bracelet length.

Remember to make the bracelet slightly longer, since it's a thick weave.
Step 13:

To finish the bracelet use the right outer cord and form a loop around both inner strands, first behind then over them.

Step 14:

Form a second loop around the inner strands using the outer left cord, first behind then over them.

Step 15:

Pull the inner cords through the frontside of the buckle.

Step 16:

Turn the bracelet to the backside and pull the inner cords through the loops formed in Step 13 and Step 14.

Step 17:

Tighten the loops firmly, pull on the ends while holding the buckle.

Step 18:

Cut and singe the ends.

 The finished bracelet.
I hope you enjoyed tying 'Anubis Scepter'.

Feel free to leave feedback or post pictures of your results.