Sunday, May 18, 2014

Knotorial 09 - The Valyrian Chain (Bracelet)

This pattern looks like a noble chain to me and it was created while watching one of my favourite tv-shows.

So I'll call it 'The Valyrian Chain'. It's an easy two color technique but requires different amounts of cord.

There's also a three color variation, maybe I'll post it another time.

Used (boiled) paracord for:
~20,5cm (~8 in.) bracelet

~195cm (~6.4 ft.) goldenrod
~145cm (~4.7 ft.) neon turquoise

To prevent the bracelet from shrinking, I recommend to put the cords in boiling hot water for a few minutes.
Step 01:

Start with a buckle connected with two colors.

Knotorial 01 shows how the cords are attached.

The shortest cords should be in the middle.

 Step 02:

This weave is tied by the backside.

Use the inner cords to form loops around the outer cords, first behind then over them.
 Step 03:

Use the outer cords to form a cross over the inner cords.
 Step 04:

Theres a small space above the loops, between the inner and outer cords on both sides, pull the outer ends through that space...
 ...pull them all the way through that space.
 Step 05:

Now pull the outer cords through the loops formed with the inner cords...
 ...and pull them all the way through the loops.
 Step 06:

Tighten the loops and knots firmly.
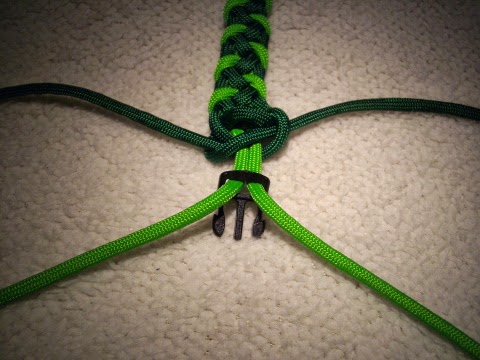
That's it, check your frontside which should look as shown in the picture.
 Repeat Step 02 - Step 06 to continue the pattern until you reached the desired bracelet length.

Don't forget to calculate the buckle and the finish for the length.
Step 07:

To finish the bracelet, turn it to the frontside and use the outer cords to form a loop around the inner cords - first under, then over them.

Don't tighten the loops, because you need them for the finish.
Step 08:

Pull the inner cords through the frontside of the remaining buckle.

Step 09:

Turn the bracelet to the backside and pull the inner cords through the loops formed in Step 07.

Step 10:

Tighten the finish, hold the buckle and pull on the cords.

The result on the frontside should look as shown in the picture.
Step 11:

Cut and singe the ends.

 The finished bracelet.
Feel free to post pictures of your results or leave some feedback.

Happy knotting !

Tuesday, May 6, 2014

Knotorial 08 - The Clinching Hooks (Bracelet)

Another bracelet is finished, this is called the 'Clinching Hooks' because the bright green pattern reminds me of it.

It's an easy technique and won't require lots of cord.

 Used (boiled) paracord for:
~20,5cm (~8 in.) bracelet

~140cm (~4.6 ft.) neon green
~140cm (~4.6 ft.) kelly green

To prevent the bracelet from shrinking, I recommend to put the cords in boiling hot water for a few minutes.
Step 01:


This time I've started with a common Cow Hitch and the second cord through it, because it's a very slim weave.

Step 02:

Use the right inner cord to form a loop around the right outer cord, first behind then over it.

Step 03:

Use the left inner cord and cross it with the right inner cord.


The cord from the loop is always underneath.
Step 04:

Use the outer right cord and pull it between the lower cross, first over then underneath it.

Step 05:

Pull the end from the right outer cord through the loop, from the backside.

Step 06:

Pull the cord all the way through the loop.

 Step 07:

Tighten the loop and knots firmly to get a result as shown in the picture.
Step 08:

Repeat the procedure on the left side, by forming a loop with the inner left cord around the outer left cord.

Step 09:

Cross the inner left cord with the inner right cord.

Make sure that the cord from the loop is always underneath.

Step 10:

Pull the outer left cord through the cross, first over then under it.

Step 11:

Pull the outer left end through the loop.

Step 12:

Pull the cord all the way through the loop.

Step 13:

Tighten the loop and knots firmly to get a result as shown in the picture.

 Repeat Step 02 - Step 13 to continue the pattern until you reached the desired bracelet length.

Don't forget to calculate the finish and the buckle for the length.
Step 14:

To finish the bracelet, use the outer cords to form an Overhead Knot around the remaining inner cords.

Step 15:

Form a second Overhead Knot.

But don't tighten them, because you need them for the finish.

Step 16:

Pull the remaining inner cords through the frontside of the buckle...

Step 17:

...then tighten the Overhand Knots firmly.

 Step 18:

Cut and singe the ends.


You can use a thimble to give it a small pattern.
 Sometimes it looks good to paint the singed ends, I've used a common cd-marker for that.
The finished bracelet.
I hope you enjoyed tying the Clinching Hooks, feel free to post pictures of your results or leave some feedback !

Knotorial 07 - The Bell Curve Knot

This short Knotorial introduces the 'Bell Curve Knot'. I couldn't find it exactly in the Ashley Book Of Knots, but it starts with a loop that looks like a bell curve, which explains the name.
I used it in a few bracelet designs too.


Please let me know if you saw this knot anywhere else !
 Step 01:

Start with a loop that
looks like a bell curve.
 Step 02:

Use a second strand to form an 'U', with the bell curve between it, as shown in the picture.

It also works with one strand but I think it looks better with two colors.
 Step 03:

Pull the right end from the 'U' through the bell curve.
 Step 04:

That's it ! Tighten the knot to get a result as shown in the picture.

To continue the pattern, use the lower right strand to form the next bell curve.
To wrap a keyring with this knot, form a bell curve through the ring.

I used almost 4 foot of each color, so there was enough left to make a keyfob out of it.
Pull the second strand through the ring over the bell curve, as shown in the picture...
...then pull it behind itself.
Now pull the end through the bell curve and tighten the knot.
Use the lower right end to form the next bell curve behind the keyring.

Pull the second strand first over the keyring, behind the belle curve strands and then through its loop on the left.

Tighten the knot and continue the pattern.

When it's finished, pull the left strand from the bell curve through the last right loop of the second color.

I pulled all strands through a bead and formed a Matthew Walker Knot for the result on the picture.